Developer Guide
Table of Contents
- Introduction
- Acknowledgements
- Terminologies
- Symbols
- Getting Started
- Design
- Implementation
- Appendix A: Product Scope
- Appendix B: User Stories
- Appendix C: Non-Functional Requirements
- Appendix D: Glossary
- Appendix E: Instructions for Manual Testing
- Appendix F - Examples of Saved Recipe Files
Introduction
Decodex is a Command Line Interface (CLI) application for Capture-The-Flag (CTF) players to perform encoding, decoding, encryption and decryption of data, which come in the form of modules that can be executed with ease and without any programming needed. Decodex also provides recipes that can also be used to link several of these modules together so that they could be executed in one go to speed up repetitive tasks. The intuitive interaction can thus help to speed up a player’s performance during CTFs and save time without having to manually code the tedious data transformations.
Purpose of This Guide
The purpose of this guide is to provide more information on our application, Decodex, such as the overall architecture, implementation and design rationales to developers who wish to contribute and enhance Decodex to it’s fullest potential. As of the release of this developer guide, it is written for Decodex V2.1.
This guide may also serve as a start for software testers to find bugs and possibly edge cases within our applications.
Developer Guide Usage
To better understand this developer guide, it is recommended to start off from the Architecture section to have a high-level view of the application, before diving into each of the specific components to understand Decodex’s design and implementation.
Acknowledgements
Terminologies
| Terminology | Definition |
|---|---|
| Data transformation | The conversion of one data format to another. |
| Application, Program | Refers to the Decodex program. These two terms are used interchangeably in this Developer Guide. |
| Encoding | Convert a message into a coded form. |
| Decoding | Convert a coded message into an intelligible form |
| Encryption | Conversion of a message into a form where only authorized parties are able to decipher it. |
| Decryption | Conversion of an encrypted message back to its original form by deciphering it. |
| Base64, Binary, Hexadecimal | Common types of data encoding standards. |
| Console | This refers to your command prompt window. |
| Argument | The additional information you provide to the program’s command. |
| Module | A self-contained set of instructions to process your data into another form. |
| Recipe | Acts as a container for you to select your modules. When multiple modules are selected, this forms a “module chain”. By default, you do not have any recipes. |
| XYZ | Represents a wildcard of the specific mentioned. eg. XYZCommand can be SelectCommand, ListCommand etc. |
| Suffix | Something that comes at the end. e.g. For for text files like recipe.txt then .txt is the suffix. |
Symbols
| Name | Definition |
|---|---|
| Represents a good tip for you. | |
| Represents something important that you should take note of. | |
| Represents additional information regarding commands/features for you better understand how it works. | |
| Represents our rationale behind the design/implementation. |
Getting Started
Setting Up the Project
- Forking and cloning
- Fork our repository.
- Then, clone the fork onto your computer.
💡 For convenience, our repository can be found here.
- Editor
- We highly recommend using Intellij IDEA, which can be downloaded from here.
- However, you may still use other editors that you prefer. Just take note that most of our set ups are centered around Intellij.
- Configure JDK
- Follow the guide at [se-edu/guides] IDEA: Configuring the JDK to ensure Intellij is configured to use JDK 11, since our application runs on
Java 11.
- Follow the guide at [se-edu/guides] IDEA: Configuring the JDK to ensure Intellij is configured to use JDK 11, since our application runs on
- Importing project
- Follow the guide at [se-edu/guides] IDEA: Importing a Gradle project to import the forked project into Intellij.
 Note: Importing a Gradle project is slightly different from importing a normal Java project.
 - Verifying setup
- Run the
decodex.Decodex.javaand try a few commands. - Run the tests to ensure they all pass.
- Run the
Additional Considerations
- Configure the coding style
- If using IDEA, follow the guide [se-edu/guides] IDEA: Configuring the code style to set up IDEA’s coding style to match ours.
💡 Tip: Optionally, you can follow the guide [se-edu/guides] Using Checkstyle to find how to use the CheckStyle within IDEA e.g., to report problems as you write code.
- If using IDEA, follow the guide [se-edu/guides] IDEA: Configuring the code style to set up IDEA’s coding style to match ours.
- Set up CI
- This project comes with a GitHub Actions config files (in
.github/workflowsfolder). When GitHub detects those files, it will run the CI for your project automatically at each push to themasterbranch or to any PR. No set up required.
- This project comes with a GitHub Actions config files (in
- About our code structure
- OOP standardized
- Modularized.
- Any changes/additions to the current commands would simply require the changes within
Parser.java. - For any changes/additions to the modules, would simply require changes within the
src/main/java/decodex/modulesfolder.
- Any changes/additions to the current commands would simply require the changes within
- This structure makes it easier for us as well as developers like you to maintain and further extend the capabilities of our application.
XYZCommandrefers toSelectCommand,ListCommandetc, andXYZModulerefers toBase64Encoder,HexDecoder, etc.
Design
Architecture
The Architecture Diagram given below shows the high-level design of Decodex.
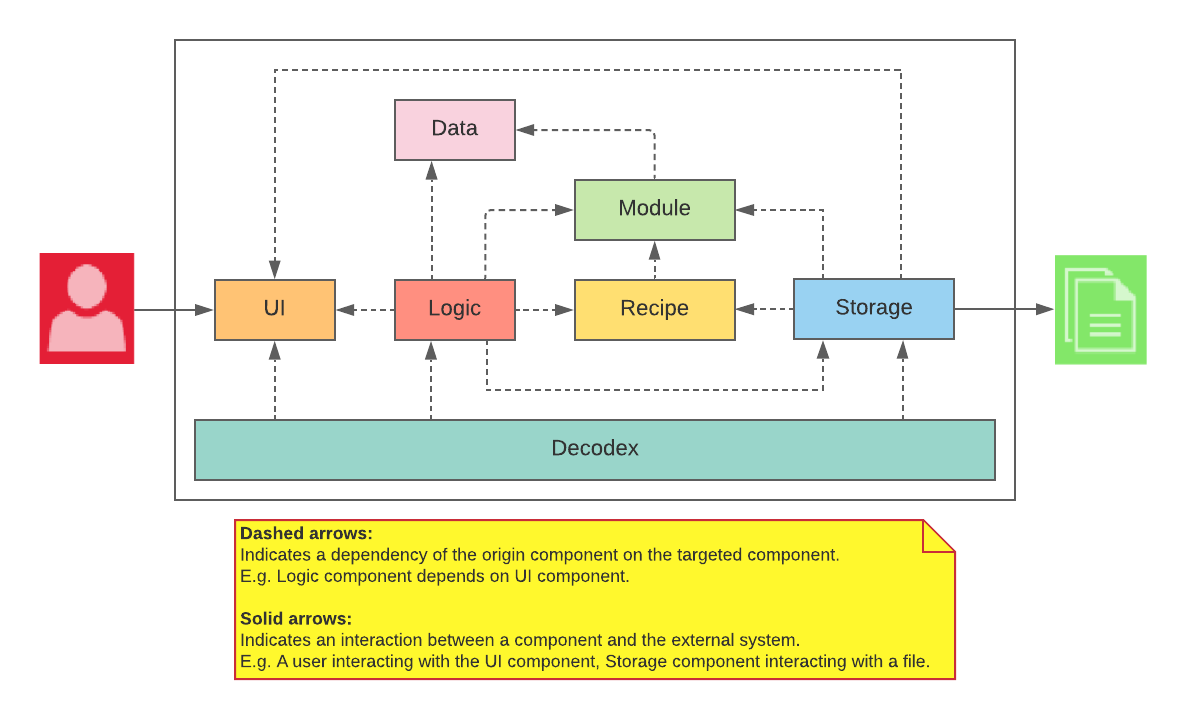
Main Components of The Architecture
Decodex is responsible for initialising the components at launch.
The rest of the program consists of 6 other components:
-
UI: Handles user input and message output to the console -
Logic: Parses user input and executes commands -
Recipe: Manages a sequence of module to be executed -
Module: Manages a set of encoding and decoding processes -
Data: Holds the data that is to be encoded or decoded -
Storage: Manages the reading and writing of data to disk
UI Component

The Ui component consists of:
-
Ui: Manages access to theScannerobject that reads user input and also contains all the methods for printing to the user.
Logic Component
Below is a partial class diagram that shows an overview of the Logic component.
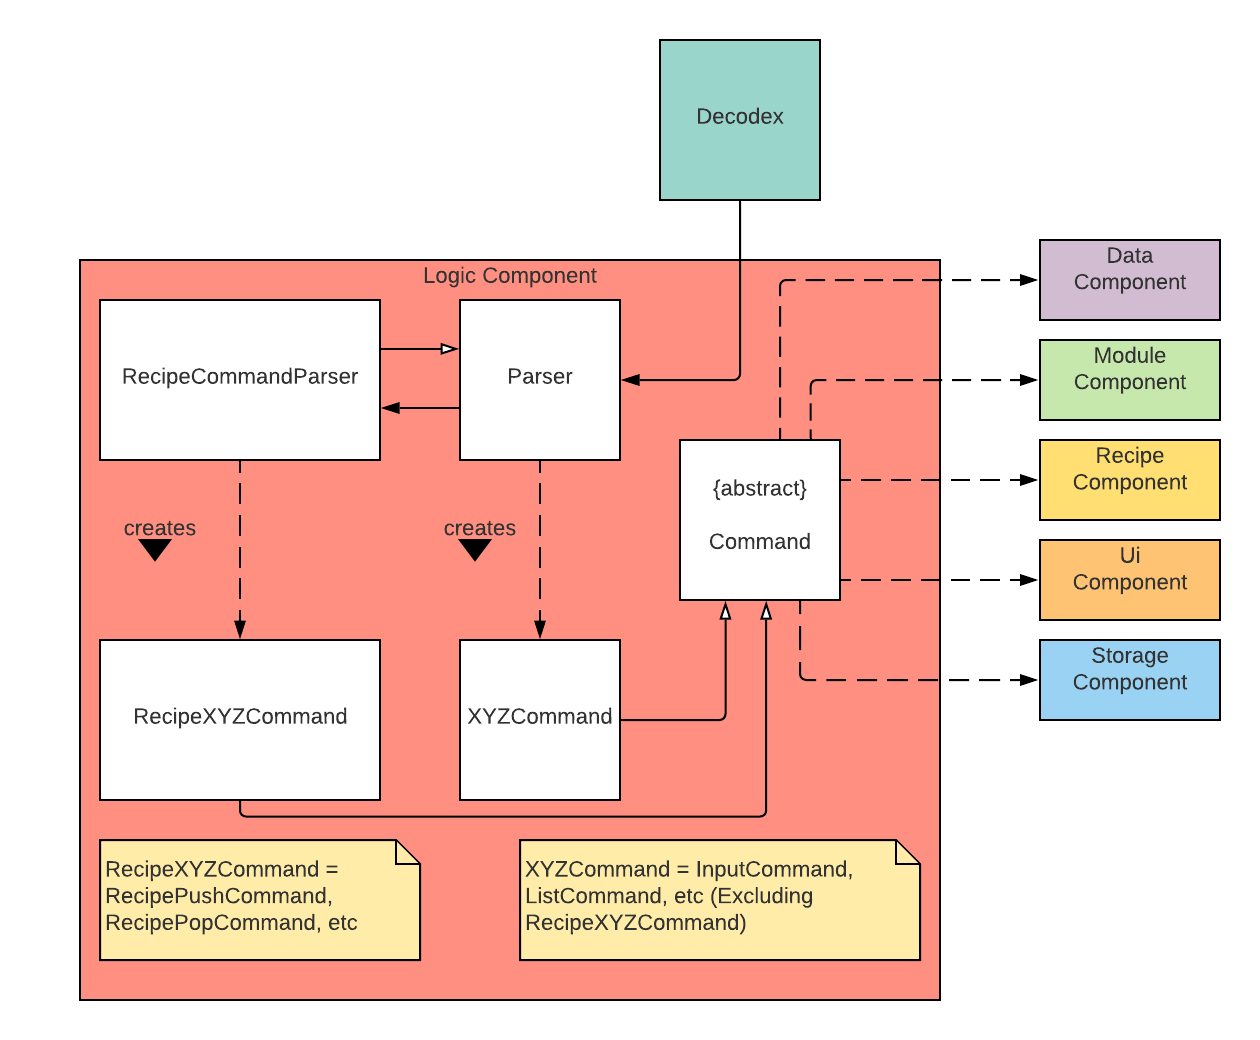
The Logic component consists of:
-
Parser: Handles user input and decides theXYZCommandobject to create. -
RecipeCommandParser: WhenParserdetects that aRecipeXYZCommandobject needs to be created, the user input is handed over fromParserandRecipeCommandParserwill decide theRecipeXYZCommandobject to create. -
Command: An abstract class that defines the blueprint for the derivedXYZCommandandRecipeXYZCommandclasses.-
InputCommand: Takes in a string from the user and sets it as the currentDataobject to perform operations on. -
ShowCommand: Shows the current Data object. -
HelpCommand: Displays all command syntaxes to the user. -
ListCommand: Displays allModuleobjects and loadedRecipeobjects to the user. -
SelectCommand: Executes a supportedModuleobject or a loadedRecipeobject on the currentDataobject and replaces it with the resultingDataobject from the execution. -
ResetCommand: Reverts the currentDataobject to a state before any modules/recipes were executed on it. -
ExitCommand: Exits the application. -
RecipeNewCommand: Creates a newRecipeobject with name provided by the user and creates a save file for it on the file system. -
RecipeSelectCommand: Set aRecipeobject as the recipe that is currently being edited. -
RecipeDeselectCommand: Set the currently editedRecipeobject as no longer being edited. -
RecipeListCommand: Display allModuleobjects in aRecipeobject. -
RecipePushCommand: Appends aModuleobject to theRecipeobject that is currently being edited. -
RecipePopCommand: Removes the latestModuleobject from theRecipeobject that is currently being edited. -
RecipeResetCommand: Removes allModuleobjects from theRecipeobject that is currently being edited. -
RecipeDeleteCommand: Deletes aRecipeobject from the application as well as its corresponding save file on the file system.
-
Below is the class diagram showing the association between the Decodex class and the Parser class.

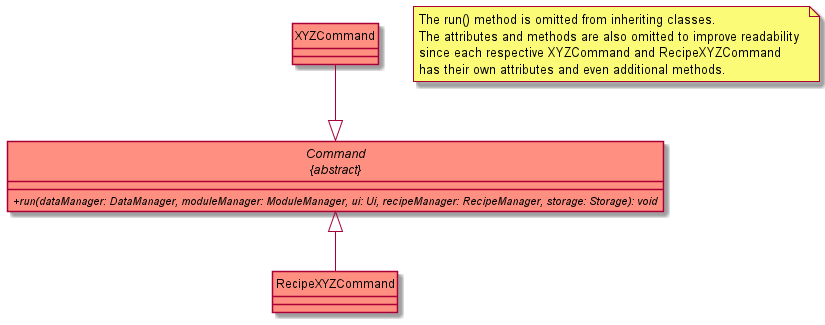
Below is the class diagram showing the association between the abstract Command class and its XYZCommand and RecipeXYZCommand classes mentioned earlier.
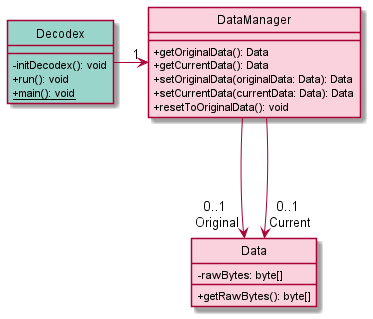
Data Component
Below is a partial class diagram that shows an overview of the Data component.
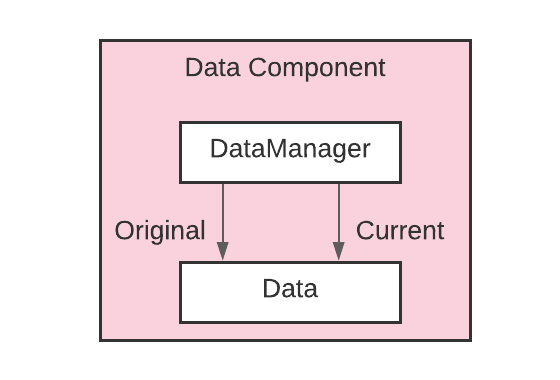
The Data component consists of:
-
Data: Used to hold the bytes which the data transformations will act on. -
DataManager: Holds a reference to the currentDataobject and updates it when aModuleorRecipeis executed.
Below is the class diagram showing the association between the Decodex class, the DataManager class and the Data class.
Module Component
Below is a partial class diagram that shows an overview of the Module component.
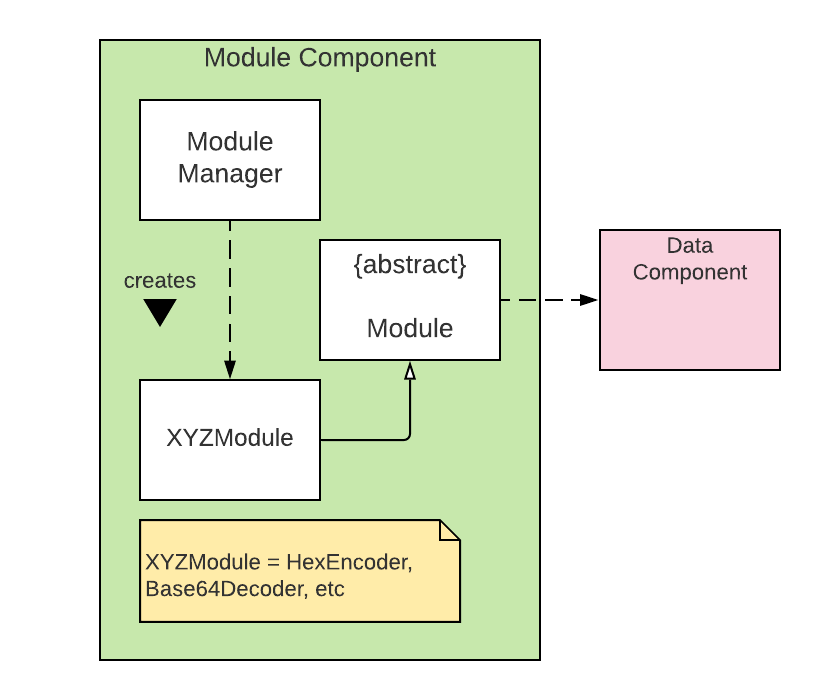
The Module component consists of:
-
Module: An abstract class that defines the blueprint for the derivedXYZModuleclasses.-
Base64Encoder,Base64Decoder: Performs base64 encoding/decoding operations -
HexEncoder,HexDecoder: Performs hexadecimal encoding/decoding operations -
BinaryEncoder,BinaryDecoder: Performs binary encoding/decoding operations -
RotEncoder: Performs rotational cipher operation
-
-
ModuleManager: Decides and generates the necessaryModuleobjects to be added toRecipeobjects or to be executed onDataobjects.
Below is the class diagram showing the association between the Decodex class, the ModuleManager class.

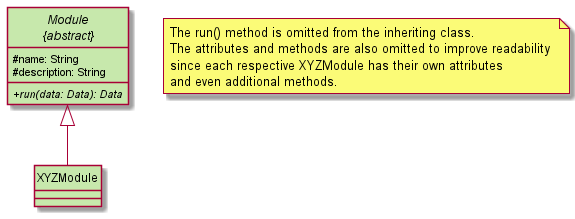
Below is the class diagram showing the association between the abstract Module class and its derived XYZModule classes.
Recipe Component
Below is a partial class diagram that shows an overview of the Recipe component.
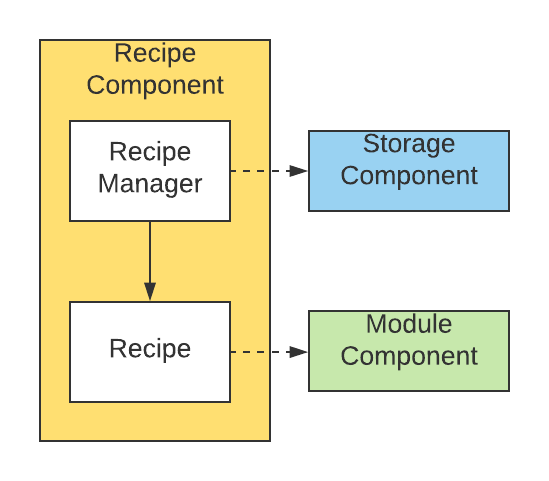
The Recipe component consists of:
-
Recipe: Holds a chain ofModuleobjects that, when ran, will execute sequentially on aDataobject. -
RecipeManager: Manages all loadedRecipeobjects and holds a reference to theRecipeobject that is currently being edited.
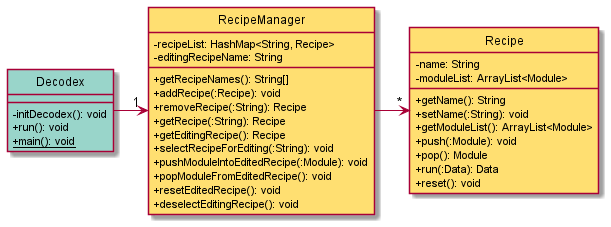
The reason for having
Recipeobjects is to enable users to run multiple modules at one go sequentially.
Storage Component

The Storage component consists of:
-
Storage: Performs all file related operations such as reading/saving to files and deleting of files.
To add on, the Storage component is designed to access only the following folders:
-
recipe/: For recipe files.
Implementation
This section focuses on explaining the specific application flows and the interactions between the classes and their methods.
![]() The lifeline of the objects should terminate at the destroy marker (
The lifeline of the objects should terminate at the destroy marker (X), however due to a limitation of the PlantUML software, the lifeline extends beyond the destroy marker.
Decodex Initialisation
Below shows the sequence diagram of the initialisation of Decodex.
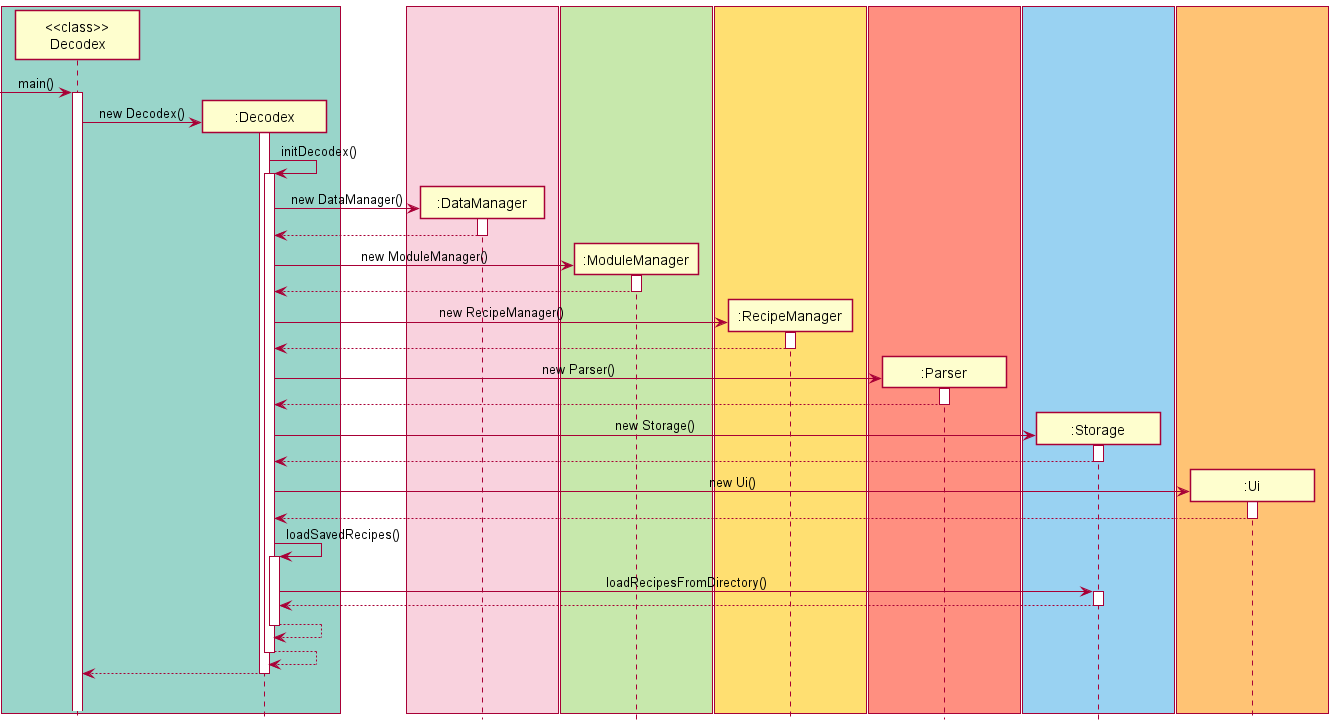
During the initialisation sequence of Decodex, all the dependencies (i.e DataManager, ModuleManager .etc) are instantiated, which will later on be passed to the relevant commands and methods for usage.
Decodex Main Logic
Below is the sequence diagram showing the overall flow of Decodex.
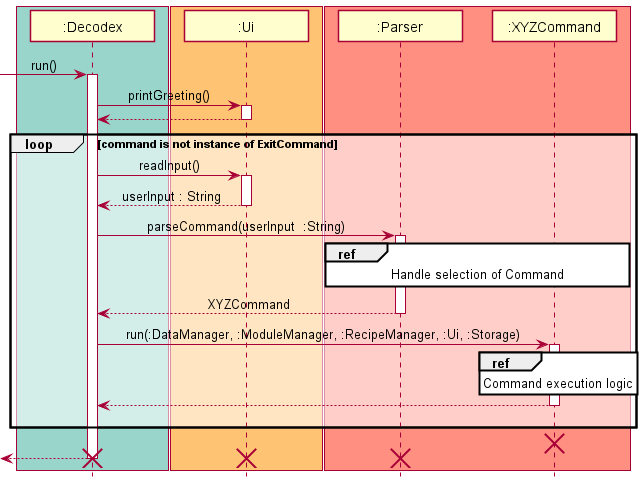
This main logic occurs after the initialisation sequence in the previous figure. It comprises of the main loop that provides the interactivity to the user by reading input from them and attempting to execute it as a command. The loop terminates when the user enters the exit command.
Parser - Basic Command Logic
Below is the sequence diagram that shows the overall flow of the Parser logic.
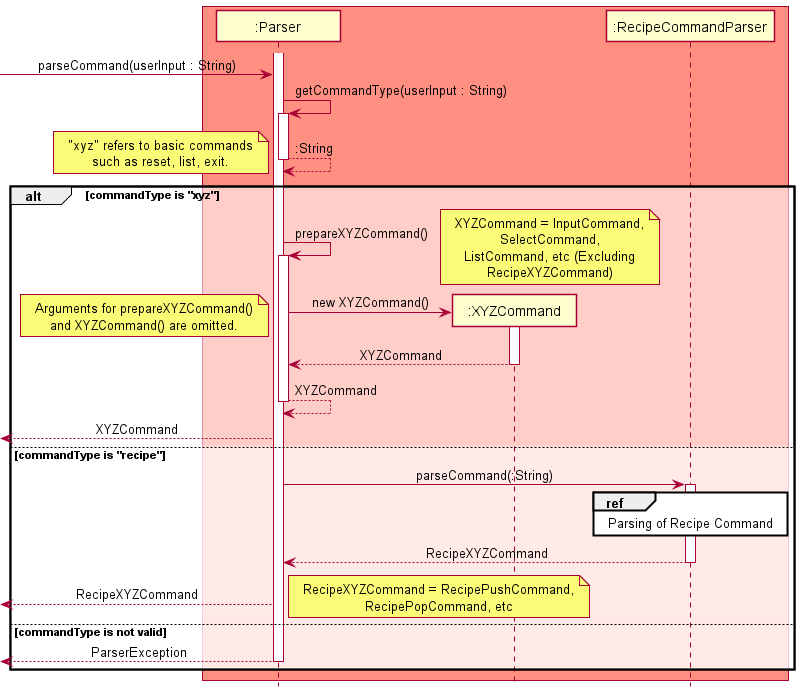
The flow of the Parser logic:
- Receives the user input and parses it to get the command type.
- Prepares the corresponding
XYZCommand.- However, if the command is a
RecipeXYZCommand, it will be passed toRecipeCommandParserfor subcommand parsing.
- However, if the command is a
- Returns the
Commandobject back toDecodex.
Parser - Recipe Command Logic
Below is the sequence diagram that shows the overall flow of the RecipeCommandParser logic.
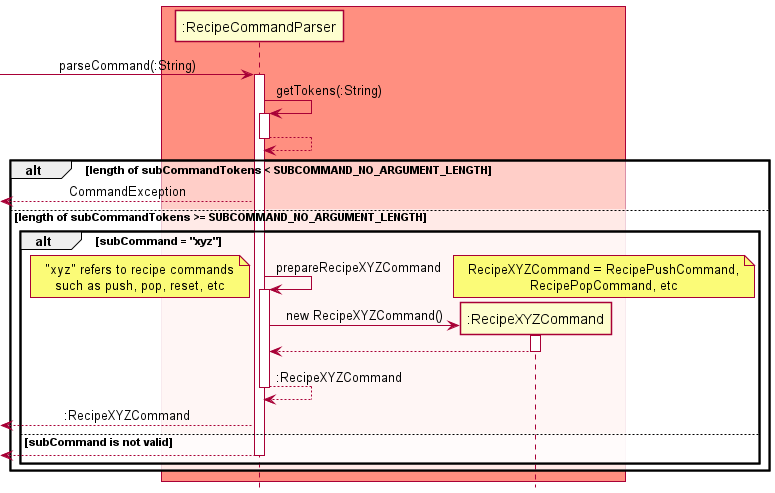
The general process of the RecipeCommandParser logic consists of:
- Receives the user input from
Parserthen parses it to get the subcommand type. - Prepares the corresponding
RecipeXYZCommand - Returns the
RecipeXYZCommandobject back toDecodex.
Modules
The abstract Module class serves as the base class for all modules to be inherited from. It contains essential information that must be present in every module developed for Decodex.
-
name: The name of the module -
description: The description of the module -
run(Data data): The abstract method to process the providedData
The name and description variables must be set during the instantiation of the module, that is to say in the constructor.
The abstract run(Data data) method should be implemented to access the bytes inside the given Data object, perform some processing on them, construct a new Data object from the results and return it.
There are two groups of modules supported by Decodex:
- Modules that do not take in any parameters
- Modules that take in at least one parameter
Modules that do not take in any parameters
This group of modules do not require any additional parameters as their encoding and decoding processes are fixed. Hence, the constructors of these modules should not receive any parameters.
Modules that take in at least one parameter
This group of modules require at least one additional parameter as their encoding and decoding processes are dependent on the provided parameters. The constructors of these modules should receive parameters as required and stored in private variables. These variables will then be used in their respective run(Data data) method.
The current implementation of the abstract Module class provides a strong foundation to be inherited by much more complex modules, and developed into full-functioning modules for Decodex.
Implemented Modules:
| No Parameters | At Least One Parameter |
|---|---|
Base64Encoder Base64Decoder HexEncoder HexDecoder BinaryEncoder BinaryDecoder
|
RotEncoder |
List of Commands
run()method is omitted to improve readability.
HelpCommand
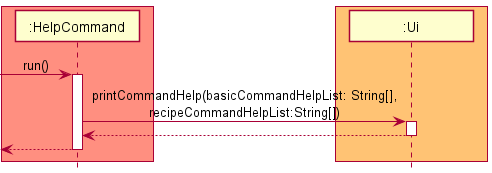
When the Parser recognises the help keyword from the user input, a HelpCommand is instantiated.
- Prints out the list of all available command (
XYZCommandandRecipeXYZCommand) syntaxes, and their corresponding descriptions.
InputCommand
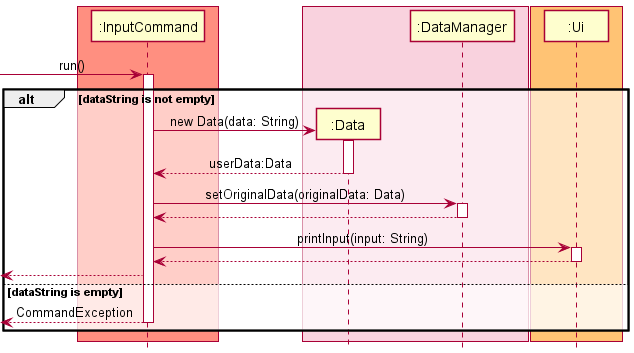
When the Parser recognises the input keyword from the user input, an InputCommand is instantiated.
- Create a
Dataobject from the user input. - Set the created
Dataobject as theoriginalDatain theDataManager. - Prints the provided user input back to the console.
ShowCommand
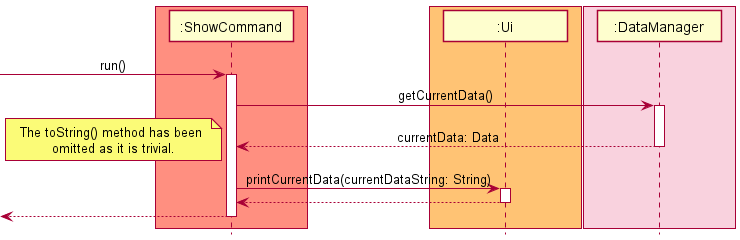
When the Parser recognises the show keyword from the user input, an ShowCommand is instantiated.
- Gets the current
Dataobject stored in DataManager. - Prints the current data to the console.
ExitCommand
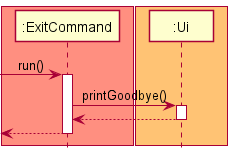
When the Parser recognises the exit keyword from the user input, an ExitCommand is instantiated.
- Prints the goodbye message to the console.
ResetCommand
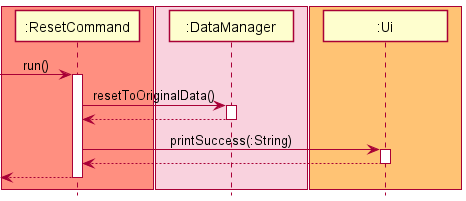
When the Parser recognises the reset keyword from the user input, a ResetCommand is instantiated.
- Replace the contents of
currentDatainDataManagerwith that oforiginalData. - Prints a successful reset message to the console.
SelectCommand

When the Parser recognises the select keyword from the user input, a SelectCommand is instantiated.
- If
selectCategoryis-
module, the selectedModuleis retrieved and executed on the providedData. See SelectCommand (Module) for the full sequence diagram. -
recipe, the selectedRecipeis retrieved and itsModuleobjects are executed on the providedData. See SelectCommand (Recipe) for the full sequence diagram.
-
SelectCommand (Module)
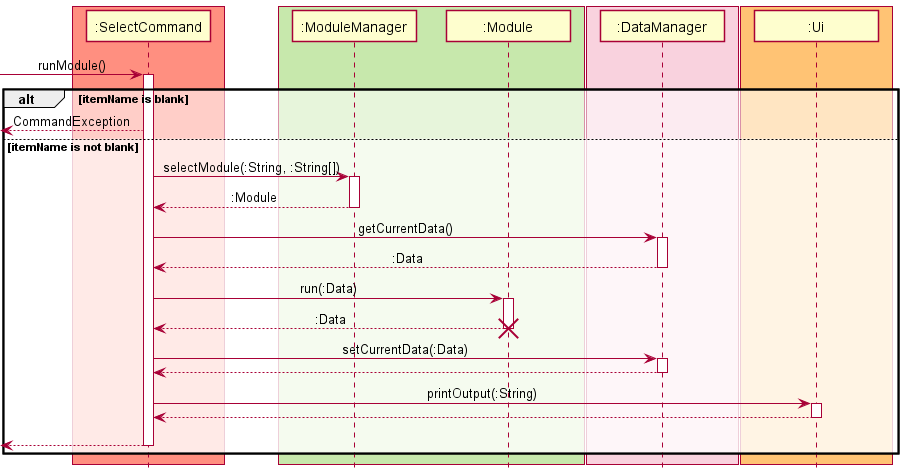
- Retrieves the corresponding
Modulewith the provideditemNameandparametersfromModuleManager. - Retrieves the current
Dataobject fromDataManager. - Executes the selected
Moduleon the retrievedDataobject and stores the processed content in a newDataobject. - Sets the new
Dataobject as the current data inDataManager. - Prints the contents of the new
Dataobject to the console.
SelectCommand (Recipe)
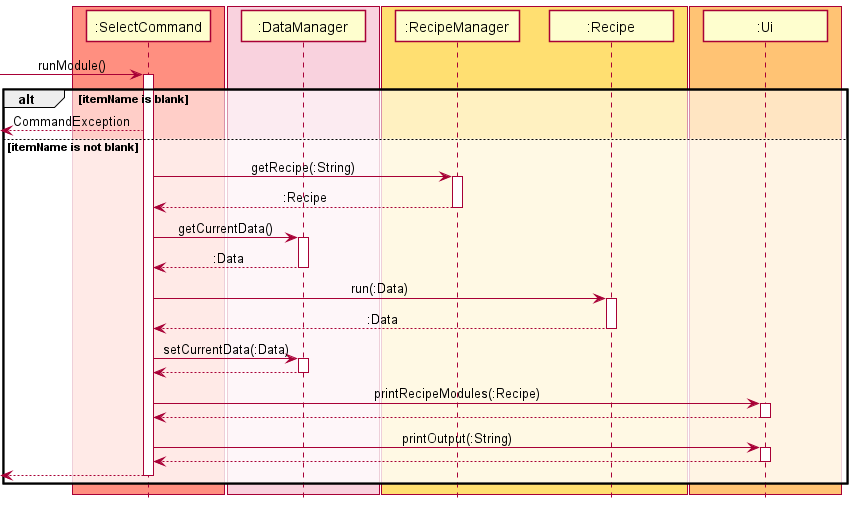
- Retrieves the corresponding Recipe with the provided
itemNamefromRecipeManager. - Retrieves the current
Dataobject fromDataManager. - Executes the selected
Recipeon the retrievedDataobject and stores the processed content in a newDataobject. - Sets the new
Dataobject as the current data inDataManager. - Prints the
Moduleobjects in the executedRecipeto the console. - Prints the content of the new
Dataobject to the console.
ListCommand
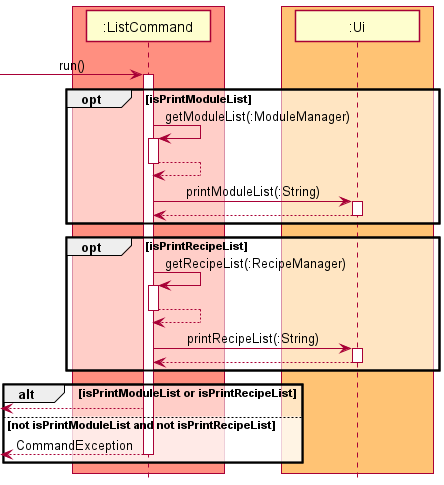
When the Parser recognises the list keyword from the user input, a ListCommand is instantiated.
The ListCommand would then parse any optional arguments, setting the isPrintModuleList and isPrintRecipeList boolean variables appropriately.
- If
isPrintModuleListis true- Retrieves a list of all
Moduleobjects fromModuleManager. - Prints the retrieved list of
Moduleobjects to the console.
- Retrieves a list of all
- If
isPrintRecipeListis true- Retrieves a list of all
Recipeobjects fromRecipeManager. - Prints the retrieved list of
Recipeobjects to the console.
- Retrieves a list of all
Recipe Commands
The following commands are specific to managing modules within recipes.
The command format begins with the command keyword recipe, followed by a subcommand keyword, and finally any arguments.
Format: recipe <subcommand> {arguments}
Example: recipe new newRecipe
RecipeNewCommand
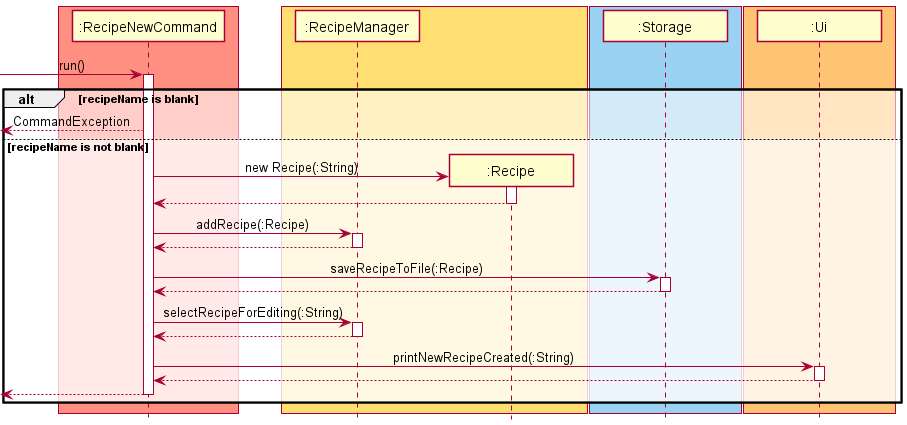
When the RecipeCommandParser recognises the new subcommand keyword from the user input, a RecipeNewCommand is instantiated.
- Creates a new
Recipeobject with the providedrecipeName. - Add the newly created
Recipeinto theRecipeManager. - Sets
recipeNameas theeditingRecipeNameinRecipeManager. - Prints a successful creation message to the console.
RecipeSelectCommand
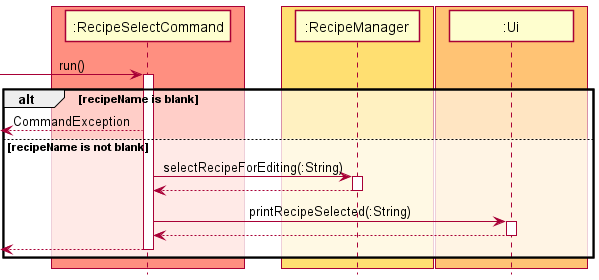
When the RecipeCommandParser recognises the select subcommand keyword from the user input, a RecipeSelectCommand is instantiated.
- Retrieves the
Recipecorresponding with the providedrecipeNamefromRecipeManager. - Sets
recipeNameas theeditingRecipeNameinRecipeManager. - Prints a successful selection message containing the
recipeNameto the console.
RecipeDeselectCommand
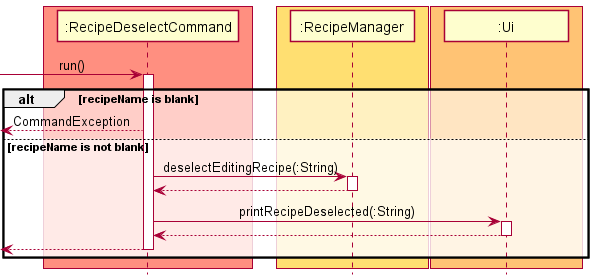
When the RecipeCommandParser recognises the deselect subcommand keyword from the user input, a RecipeDeselectCommand is instantiated.
- Retrieves the
recipeNameof theRecipecorresponding toeditingRecipeNameinRecipeManager. - Sets the
editingRecipeNameinRecipeManagerasnull. - Prints a successful deselection message containing the
recipeNameto the console.
RecipeListCommand
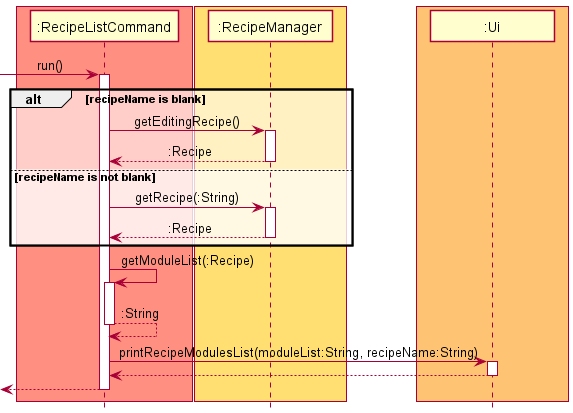
When the RecipeCommandParser recognises the list subcommand keyword from the user input, a RecipeListCommand is instantiated.
- If
recipeNameis- blank, the
Recipewith the currenteditingRecipeNameis retrieved. - not blank, the
RecipewithrecipeNameis retrieved.
- blank, the
- Retrieves the list of
Moduleobjects belonging to theRecipewithrecipeName. - Prints the names and parameters of each
Moduleobject in the retrieved list.
RecipePushCommand
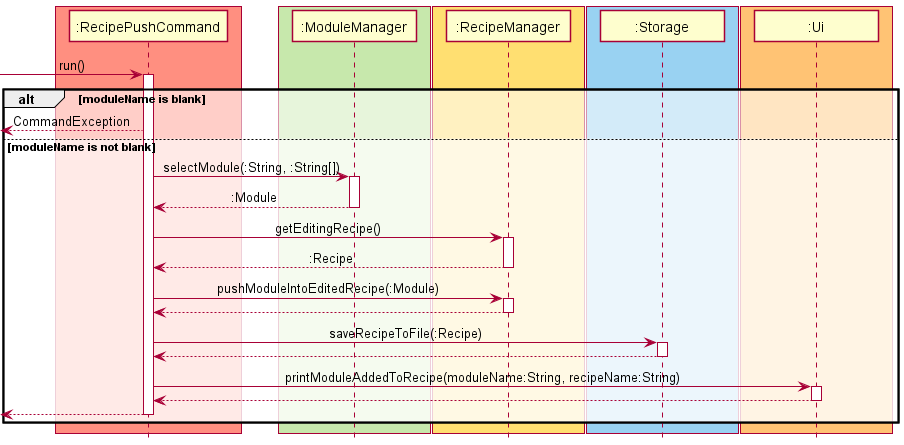
When the RecipeCommandParser recognises the push subcommand keyword from the user input, a RecipePushCommand is instantiated.
- Retrieves the corresponding
Modulewith the providedmoduleNameandparametersfromModuleManager. - Retrieves the current editing
Recipe. - Adds the retrieved
Moduleinto the current editingRecipe. - Prints the a message of the added
Moduleto the console.
RecipePopCommand
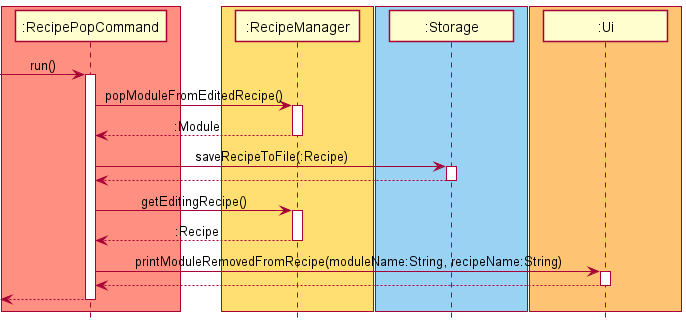
When the RecipeCommandParser recognises the pop subcommand keyword from the user input, a RecipePopCommand is instantiated.
- Retrieves the latest
Moduleadded to theRecipe, and removes it from theRecipeafter retrieval. - Retrieves the current editing
Recipe. - Prints the a message of the removed
Moduleto the console.
RecipeResetCommand
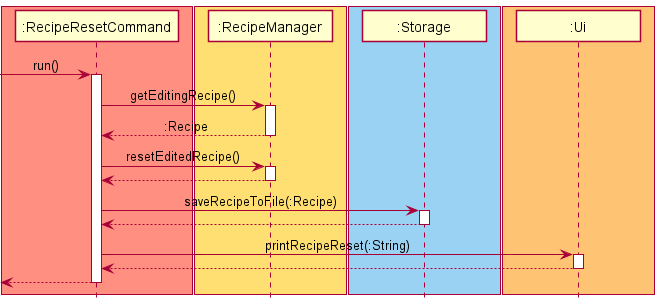
When the RecipeCommandParser recognises the Reset subcommand keyword from the user input, a RecipeResetCommand is instantiated.
- Retrieves the
Recipewith the currenteditingRecipeNameis retrieved. - Removes all modules contained in the
Recipe - Prints a successful reset message containing the
recipeNameto the console.
RecipeDeleteCommand
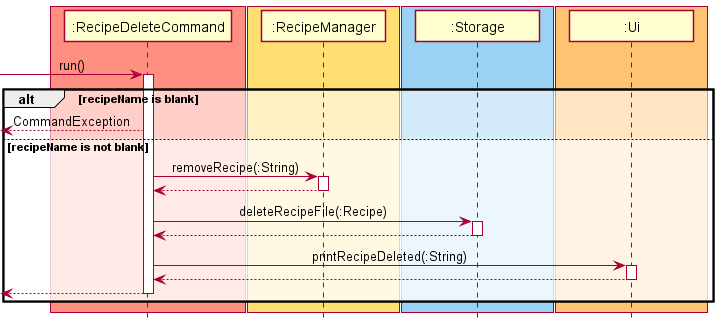
When the RecipeCommandParser recognises the delete subcommand keyword from the user input, a RecipeDeleteCommand is instantiated.
- Removes the
Recipewith therecipeNamefromRecipeManager. - Prints
recipeNameas the deletedRecipeto the console.
Appendix A: Product Scope
Target User Profile
- Prefer using CLI over other types
- Can type fast
- Does Capture-the-flag (CTF) competitions
- Requires to use multiple data manipulation techniques at once
- Is comfortable with CLI
- May be for both normal and expert users (in terms of technical capabilities)
Value Proposition
This application helps users (mainly CTF players) to quickly transform data from one format to another (e.g., from plain text to base64-encoded text). It includes features such as the ability to perform basic data transformations with a few simple commands. Furthermore, it also includes the use of recipes to allow for multiple modules to be executed in sequence, which would be useful when multiple consecutive data transformations are needed.
To sum it up, this application helps users to reduce the time needed to transform data from one form to another, especially when consecutive data transformations are required.
Appendix B: User Stories
| version | priority | as a … | I want to… | so that i can … |
|---|---|---|---|---|
| V1.0 | *** | user | input data | perform data manipulation on it |
| V1.0 | *** | user | see the output of my processed data | see the effects of the change |
| V1.0 | *** | user | view a list of modules | see what modules I can use on my data |
| V1.0 | *** | user | add a module | decided to process data with the selected module |
| V1.0 | *** | user | run a module | process data with the selected module |
| V2.0 | *** | user | create a new recipe | create different combinations of module chains |
| V2.0 | *** | user | view a list of modules while creating recipe | decide what modules to be added to the recipe |
| V2.0 | *** | user | add a module to the recipe | use it process my data |
| V1.0 | ** | user | remove all modules in the recipe | see my original input data |
| V2.0 | ** | expert user | read input data from a file | process data that are not printable or terminal-friendly |
| V2.0 | ** | expert user | edit the exported recipes | inspect and modify it in an editor |
| V2.0 | ** | user | see the list of the commands | know what commands I can use |
| V2.0 | ** | user | see the syntax of the commands | know how to use the commands |
| V2.0 | ** | CTF Participant | save my decoded output | reuse the output later |
| V2.0 | ** | user | import recipes from a file | I do not have to create the recipe from scratch/manually |
| V2.0 | ** | user | save my recipes to a file | I can reuse the recipe on a different computer |
| V2.0 | ** | user | list the recipes I have | use them again |
Appendix C: Non-Functional Requirements
- Should work on any mainstream OS as long as it has Java
11or above installed. - Should be able to have up to 20 recipes without any impact on the performance.
- A CTF participant should be able to work more efficiently on their CTF challenges compared to manual scripting in terms of time.
- A user should be able to comfortably use and understand the application if they are within the IT field.
- A user with above average typing speed for regular English text (i.e. not code, not system admin commands) should be able to accomplish most of the tasks faster using commands than using the mouse.
Appendix D: Glossary
- Mainstream OS: Windows, Linux, Unix, OS-X
Note: These instructions only provide a starting point for testers to work on, testers are expected to do more exploratory testing.
Appendix E: Instructions for Manual Testing
Start and Shutdown
- Ensure you have Java version
11or above installed on your computer. - Next, download the latest
decodex.jarhere. - Copy the
decodex.jarinto an empty folder. - Run the
decodex.jaron your command prompt by typing injava -jar decodex.jarthe pressEnter. - Type a command in the command box after the
Decodex [] >prompt and press Enter to execute it. e.g. typinghelpand pressingEnterwill show a list available commands, their respective descriptions and syntaxes. - To exit Decodex, use the
exitcommand. Alternatively, Decodex can be exited usingCtrl+Cor by closing the command prompt window.
Inputting Data
When entering data, Decodex requires a specific format such that the data is entered correctly.
The program will consider all characters following the first space character as data in the input command. You may observe leading and trailing whitespaces in the output.
Non-printable characters (e.g. null characters) may not be correctly displayed and could potentially scramble the user interface.
There will only be one instance of data at any time. Running the
inputcommand will overwrite the current data that is stored in the program.
Here are some example inputs you can try:
<space>indicates that there are extra spaces in the input. Replace<space>with a space character when running the example commands below.
-
input hello<space>world: Inputs “hello world” as data into the Decodex. -
input <space>hello<space>world<space>: Inputs “ hello world “ as data into Decodex. -
input goodbye<space>world: Inputs “goodbye world” as data into the Decodex.
For subsequent examples below, this guide assumes that the original input data is goodbye world.
Listing Modules and Recipes
The list command has 3 variations:
- List all modules and recipes
- List all modules
- List all recipes
The first command lists every single modules and recipes which is the combined output of the other 2 commands. No recipes will be found if no recipes have been created.
- Test case
list- Expected (if no recipes exists):
Here is the list of supported modules:
  base64encode - Encodes the data using Base64 format.
  base64decode - Decodes the data using Base64 format.
  hexencode    - Converts the input string to hexadecimal bytes.
  hexdecode    - Converts a hexadecimal string back into its raw value.
  binencode    - Encodes the data using binary format.
  bindecode    - Decodes the data using binary format.
  rotencode    - Rotates alphabetical characters by a specified integer offset.

You do not have any recipes
- Test case
list- Expected (if some recipes exists):
Here is the list of supported modules:
  base64encode - Encodes the data using Base64 format.
  base64decode - Decodes the data using Base64 format.
  hexencode    - Converts the input string to hexadecimal bytes.
  hexdecode    - Converts a hexadecimal string back into its raw value.
  binencode    - Encodes the data using binary format.
  bindecode    - Decodes the data using binary format.
  rotencode    - Rotates alphabetical characters by a specified integer offset.

Here is the list of available recipes:
  myRecipe1
  myRecipe_123
- Test case
list modules- Expected:
Here is the list of supported modules:
  base64encode - Encodes the data using Base64 format.
  base64decode - Decodes the data using Base64 format.
  hexencode    - Converts the input string to hexadecimal bytes.
  hexdecode    - Converts a hexadecimal string back into its raw value.
  binencode    - Encodes the data using binary format.
  bindecode    - Decodes the data using binary format.
  rotencode    - Rotates alphabetical characters by a specified integer offset.
- Test case
list recipes- Expected (if no recipes exists):
You do not have any recipes
- Test case
list recipes- Expected (if some recipes exists):
Here is the list of available recipes:
  myRecipe1
  myRecipe_123
Running Modules and Resetting
Running the data through multiple modules and resetting it to its original data is shown below. Here, the current data refers to the output from the previous ran module and by default, if no modules is ran, then current data is the same as input data, i.e. goodbye world.
- Following this order of execution:
-
select module hexencode: Encodes the (original) data with Hexadecimal encoding. -
select module base64encode: Encodes the current data with Base64 encoding. -
select module rotencode 5: Encodes the current data by rotating the alphabetic characters by offset of +5. -
select module binencode: Encodes the current data with Binary encoding.
-
- The resulting output would be something unintelligible.
- In order to obtain the original data, running
resetwill return the current data back to the original data that was inputted. i.e.goodbye world.
Listing Modules in Recipes
List the module sequences in previously created recipes.
- Test case:
recipe list- Expected (if a non-empty recipe was selected for editing):
Here is the list of modules in recipe myRecipe1:
  1. base64encode
  2. base64encode
  3. hexencode
- Test case:
recipe list- Expected (if an empty recipe was selected for editing):
[x] There are no modules in the recipe
- Test case:
recipe list- Expected (if no recipe was selected for editing):
[x] No recipe selected for editing.
- Test case:
recipe list <recipe name>(i.e.<recipe name>isrecipe1)- Expected (if recipe is not empty):
Here is the list of modules in recipe myRecipe1:
  1. base64encode
  2. base64encode
  3. hexencode
- Test case:
recipe list <recipe name>- Expected (if recipe is empty):
[+] There are no modules in the recipe
Creating Recipes
Creating recipes can be done using the recipe new command.
An example of a valid recipe creation command is shown below.
- Test case:
recipe new special_Recipe1- Expected:
[+] Recipe special_Recipe1 created successfully
Some examples of invalid recipe creation commands are shown below.
- Test case:
recipe new Invalid Recipe N@me!- Expected:
[x] Too many command arguments
- Test case:
recipe new XÆA-12- Expected:
[x] Recipe names can contain only alphabets, numbers and underscores and must be non-empty.
The expected output of the test case above might exceed an A4 page’s width when viewing in PDF format or when printed. See the full output on the online developer guide here.
Switching Recipes for Modification
Switching of recipes to modify them. Below shows an example of the switch from one recipe to another. The recipe deselect command is optional when switching between recipes.
Assuming there are 3 recipes myRecipe1, myRecipe_123 and special_Recipe1.
- Test case:
recipe select myRecipe1- Expected: Selects the recipe
myRecipe1for editing.
- Expected: Selects the recipe
[+] Recipe myRecipe selected for editing
Decodex [Editing: myRecipe] >
- Test case:
recipe deselect- Expected: deselects the recipe currently being edited
[+] Recipe myRecipe deselected
Decodex [] >
Modifying Recipes
Modifies the sequence of modules in a recipe.
The following test cases should be run in sequence:
- Test case:
recipe select special_Recipe1. Select the recipespecial_Recipe1for editing.- Expected: The recipe
special_Recipe1is selected for editing.
[+] Recipe special_Recipe1 selected for editing Decodex [Editing: special_Recipe1] > - Expected: The recipe
- Test case:
recipe push hexencode. Add thehexencodemodule to the recipe.- Expected: The
hexencodemodule is added to the recipe.
[+] Added hexencode module to recipe special_Recipe1 - Expected: The
- Test case:
recipe push base64decode. Add thebase64decodemodule to the recipe.- Expected: The
base64decodemodule is added to the recipe.
[+] Added base64decode module to recipe special_Recipe1 - Expected: The
- Test case:
recipe pop. If adding thebase64decodemodule was a mistake, remove it from the recipe.- Expected: The
base64decodemodule is removed from the recipe.
[+] Removed base64decode module from recipe special_Recipe1 - Expected: The
- Test case:
recipe push base64encode. The correct modulebase64encodeis added to the recipe.- Expected: The
base64encodemodule is added to the recipe.
[+] Added base64encode module to recipe special_Recipe1 - Expected: The
- Test case:
recipe push rotencode 5. Add therotencodemodule with argument5to the recipe.- Expected: The
rotencodemodule with argument5is added to the recipe.
[+] Added rotencode module to recipe special_Recipe1 - Expected: The
Running Recipes
Runs the modules in a recipe.
Assuming the input data is hello world and the previously created recipe special_Recipe1 is available.
- Test case:
select recipe special_Recipe1- Expected: The modules in
special_Recipe1is run.
- Expected: The modules in
[+] Modules executed: hexencode, base64encode, rotencode 5
[+] Output: "Sol2SYEoSrR2EoNbSeh2EohdSrR2SF=="
Deleting Recipes
Deleting a recipe.
- Test case:
recipe delete special_Recipe1- Expected:
[+] Recipe special_Recipe1 has been deleted
- Expected:
Storage of Recipe Files
Testing of invalid recipe files on startup
All recipes are stored in their respective files with the name recipeName.txt in the recipe/ directory where recipeName denotes their actual recipe name in Decodex. It is highly recommended to ensure that Decodex can access these files/directory to work properly.
Details of Recipe Files:
- If the
recipe/directory does not exist yet (first time running it), Decodex will create it automatically. - All recipe files are found in the
recipe/directory and is loaded into Decodex on startup. Only valid recipe files (e.g. correct filetype and suffix of.txt) with the valid stored formats are loaded successfully into Decodex. - Created automatically when a new recipe is created on Decodex is successfully created using
recipe newcommand, but the contents of the corresponding recipe file will be empty. - Updated automatically whenever a change (e.g. adding/removing modules) happens successfully in the respective recipe on Decodex.
- Deleted automatically whenever the corresponding recipe on Decodex is deleted successfully using
recipe delete. - The table below denotes the different behaviours on startup for an invalid
recipe/directory and 2 invalid recipe files, assuming they aremyRecipe.txtandiRecipe.md.
| Invalid Type | Error Message | Behaviour |
|---|---|---|
Wrong recipe directory filetype - the recipe/ directory is actually a file. |
[x] The recipe directory is not a valid directory |
Decodex will try to look for files in the recipe/ directory, but since it is not an actual directory, it flags to the user that it is not a valid directory. However, Decodex continues running, but users may choose to stop it to fix their directory. A simple fix would be to delete this invalid recipe/. |
Wrong recipe file filetype - myRecipe.txt is a directory instead. |
No error messages. | Decodex will try to load the contents of myRecipe.txt on startup, but since it is actually a directory, Decodex will treat it as not a recipe file and ignore it. |
Wrong recipe file suffix - iRecipe.md is not of .txt. |
No error messages. | Decodex will find that iRecipe.md is the recipe/ directory, but it does not match the valid .txt suffix, so it simply ignores it. User can simply change the extension to .txt to fix it. |
Wrong module syntaxes (e.g. If rotencode is missing an argument) - myRecipe.txt contains invalid module syntaxes.For more information on what are some examples of valid/invalid syntaxes, please refer to Appendix F |
[x] Failed to load following recipes into Decodex: myRecipe |
Decodex will try to load the contents of myRecipe.txt line by line to translate them into modules which are then loaded into the recipe called myRecipe in Decodex. Since, in this case, one of the module syntax is incorrect, the recipe fails to be loaded. If there are multiple recipe files that also failed to be loaded due to module syntaxes, then they are appended in the error message. To avoid this from happening, users are recommended to only use Decodex to make changes to these recipes. |
Appendix F - Examples of Saved Recipe Files
<moduleName> {moduleArgument}where values in<>are compulsory while those in{}are optional.
Below shows some of the case scenarios for valid and invalid module syntaxes in the saved recipe files.
Sample of valid module syntaxes in a recipe file:
- An example of the contents of a recipe file with valid module syntax on each line
    base64encode
    rotencode 13
    hexencode
Samples of invalid module syntaxes in a recipe file:
- An example of the contents of a recipe file with invalid module argument.
- On line 2, an argument is expected for rotencode module, but it is missing.
 base64encode
 rotencode
 hexencode
- On line 2, an argument is expected for rotencode module, but it is missing.
- An example of the contents of a recipe file with invalid module name.
- On line 1, the module name of “base64” does not exist/available on Decodex.
 base64
 rotencode 13
 hexencode
- On line 1, the module name of “base64” does not exist/available on Decodex.